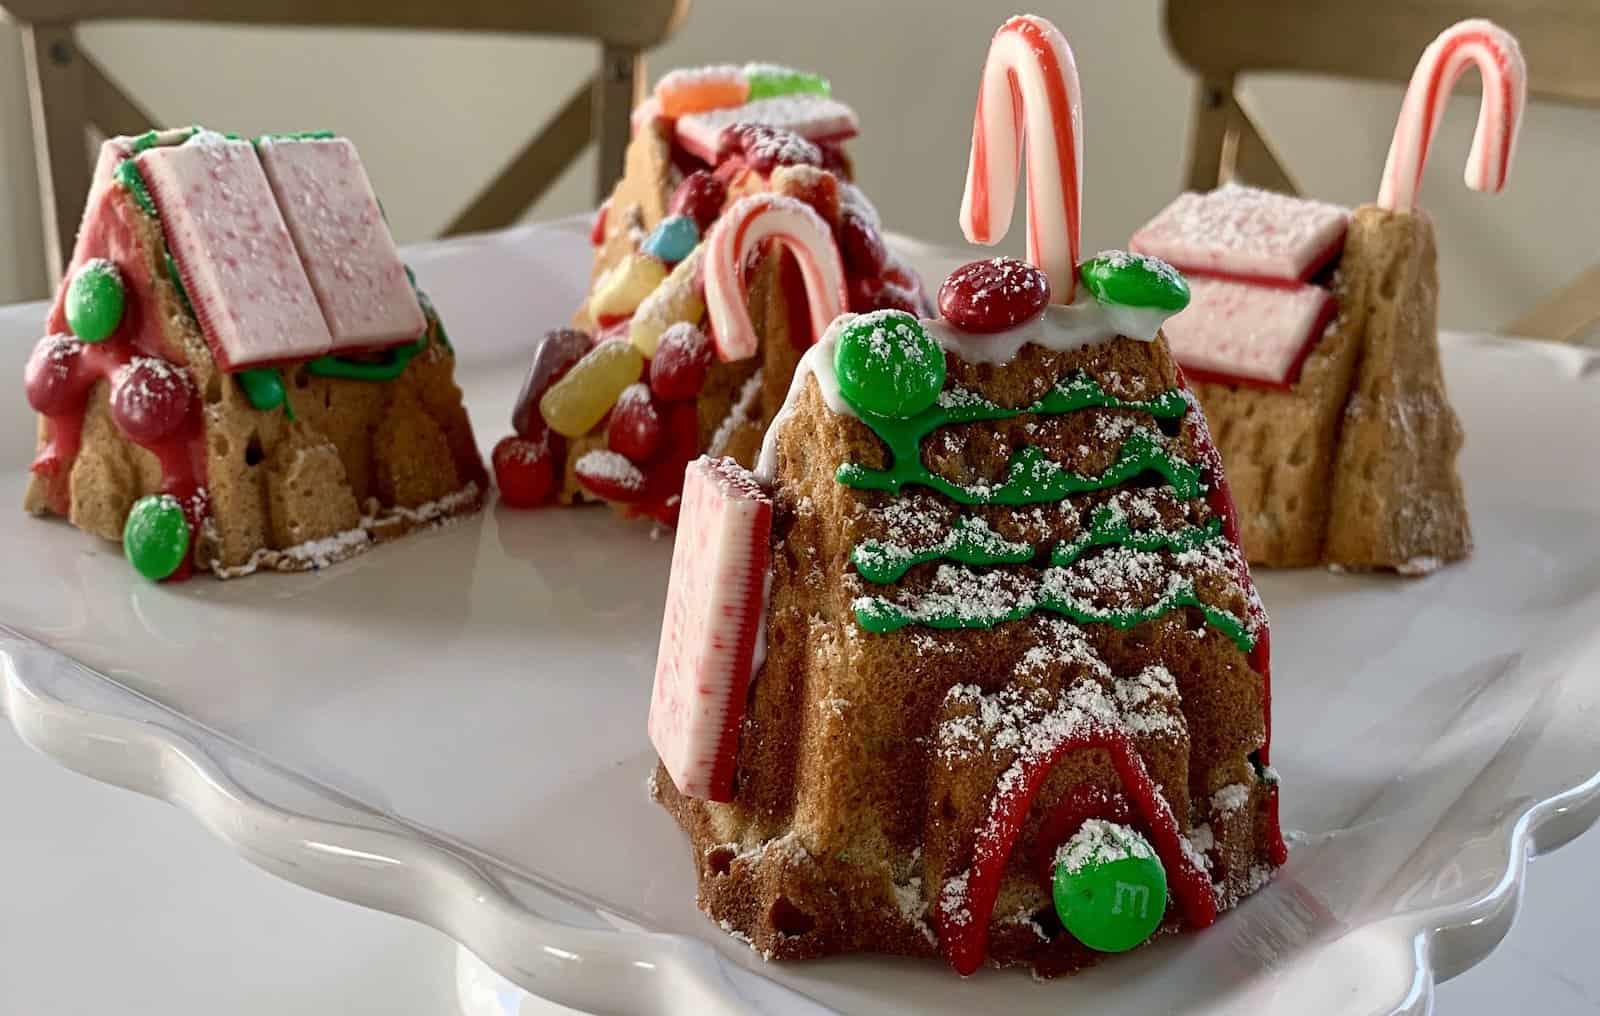
Overwhelmed at the thought of maintaining holiday traditions and being safely gluten-free? This Gluten-Free Gingerbread House is the answer to your Christmas dilemma.
It is baked in a beautiful mold you can reuse year after year and covered with gluten-free Christmas candy. Serve with a spread of gluten-free gingersnaps and gluten-free cut-out sugar cookies.
After my daughter's celiac diagnosis and an epic gluten-free gingerbread house fail, I was determined to come up with a good solution and stumbled upon this gingerbread bundt cake mold.
Fill your home with the scent of Christmas by making this easy, full-size house, or bake a whole village of miniature gluten-free gingerbread houses!
Why You'll Love This Gluten-Free Gingerbread House
- It tastes good! The days of inedible tastes-like-cardboard gingerbread houses are behind you. This gingerbread cake is so good that we throw an after-school "gingerbread-house-eating" party with my kids and their friends. Gluten-eaters love it, too!
- It's easy. Admittedly, it's not as easy as opening a box with a pre-built house, but it is really easy. No fumbling with walls held together with icing glue. The finished cake stays in one strong piece while your kids decorate it.
- It can be made ahead. Make this easy recipe a couple of days before your gingerbread house decorating party, or up to three months prior, if you freeze it.
- It's affordable. After the initial purchase of the gingerbread house bundt cake pan, in subsequent years, you'll only have to buy the recipe ingredients.
- Most importantly, it's completely gluten-free! Your kids (or you!) can be fully included in the Christmas memory-making.
At a Glance: Gluten-Free Gingerbread House
- ⏱ Total Time: 1 hour, 40 minutes (including prep, resting, cooking, and cooling), but worth it!
- 👥 Servings: 1 cake, 12 servings
- 📊 Calories: ~381 kcal per serving, undecorated (based on nutrition panel)
- 👧 Kid-Friendly: Yes! Fun holiday activity for kids and families
- 🥣 Main Ingredients: gluten-free 1-to-1 baking flour, ginger, cinnamon, eggs, baking soda, brown sugar, granulated sugar, and butter
- 📖 Dietary Info: gluten-free (always at Go Gluten Freely!)
- ⭐ Why You'll Love It: This is the easiest and most delicious answer to your gluten-free gingerbread house search!
Summarize & Save This Content On....
Jump to:
- Why You'll Love This Gluten-Free Gingerbread House
- At a Glance: Gluten-Free Gingerbread House
- Essential Equipment
- "It turned out great!"
- Key Ingredients
- Variations
- How to Make a Gluten-Free Gingerbread House
- Gluten-Free Gingerbread House Decorations
- Expert Tips!
- 6 Seasonal Variation Ideas!
- Storing & Freezing
- Frequently Asked Questions
- Gluten-Free Christmas Baking
- Gluten-Free Gingerbread House
Essential Equipment
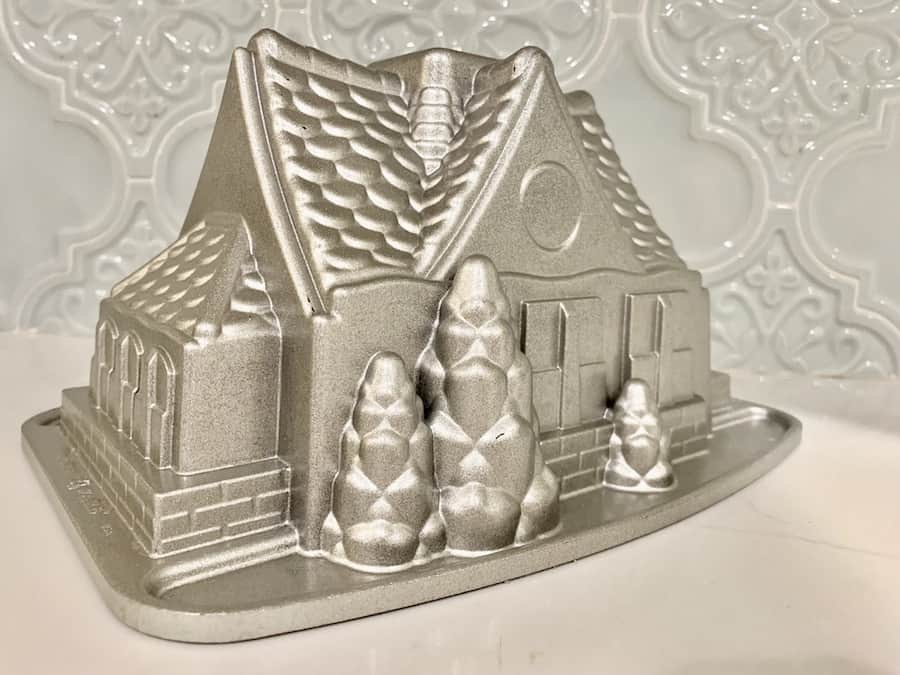
The key to an easy, gluten-free gingerbread house is this bundt cake pan! Order it early, as it does occassionally sell out.
"It turned out great!"
"I tried Go Gluten Freely's recommendation of using the bundt pan for gingerbread houses, and it turned out great!"
- Emily
Key Ingredients

- Choose a Gluten-free 1-to-1 replacement flour that contains xanthan gum, a key ingredient which replaces some of the structure and elasticity of gluten in gluten-free baking. I tested this recipe with King Arthur Gluten Free Measure for Measure Flour. To accurately measure flour, use an inexpensive kitchen scale or the spoon and level method (spoon the flour into a heaping pile in a measuring cup, and use the back of the knife to scrape/level off the top).
- Baking powder also provides structure and airiness to the cake, essential when making gluten-free cake.
- Spices: ground ginger, cinnamon, cloves, nutmeg, and vanilla extract add the seasonal warmth to this recipe, which is especially generous with ginger and cinnamon. To tone down or notch up the winter spice flavor, see variations below.
- Dark brown sugar & granulated sugar: add sweetness, moisture, and a tender texture to the gingerbread house.
- Eggs: add moisture, light texture, and importantly, more structure to the cake.
See recipe card for quantities.
Variations
Increase Seasonal Warmth & Spices
- Substitute ⅓ cup of the granulated sugar for ½ cup of molasses.
- Reduce milk to 1 cup.
- Leave the cake in the pan for an additional five minutes (15 total) before transferring it to cool on a wire rack.
Decrease Seasonal Warmth & Spices
If you have picky eaters, you can tone down the flavor by reducing the spices in the recipe as follows:
- 2 teaspoons ground ginger
- 1 teaspoon cinnamon
- ¼ teaspoon ground cloves
Boxed Cake Mix
You can use your favorite gluten-free cake or muffin mix in this gingerbread house pan. Buy two boxes!
Mix the cake batter per the instructions on the box, and let it rest for 15-20 minutes. Fill the bundt cake pan ¾ full, and use leftover batter (if any) to make a few cupcakes. Baking time will be approximately 60-70 minutes, and may vary by mix. Use a skewer to check for doneness.
How to Make a Gluten-Free Gingerbread House

Step 1: Sift Dry Ingredients
In a medium mixing bowl, sift together gluten-free flour, baking powder, salt, ginger, cinnamon, cloves, and nutmeg. Set aside the medium bowl.

Step 2: Cream Butter and Sugar and Add Eggs & Vanilla
Using a stand mixer, beat brown sugar, granulated sugar, and butter for three minutes, until light and fluffy. Add eggs one at a time until combined. Blend in vanilla.

Step 3: Mix All Ingredients Together
Reduce mixer speed to low. Gradually mix in the dry ingredients, alternating with the milk to maintain moisture. Mix for an additional two minutes to create more structure in your cake. (important for gluten-free batter)

Step 4: Rest Batter & Prepare Bundt Pan
Let the batter sit for 15-20 minutes. This rest time allows the gluten-free flour to absorb the liquids in the mixture, creating the perfect crumb and avoiding the gritty taste often associated with gluten-free baking.
While the batter rests, preheat the oven to 325℉.
Grease and flour the gingerbread house bundt pan using Crisco (or soft butter) and gluten-free flour. Use a pastry brush to dust the details of the pan.

Step 5: Fill Bundt Pan and Bake
Spoon the batter into the prepared gingerbread house bundt pan, filling only ¾ full. Spread the batter up the sides of the pan, so it is lower in the center and the sides are covered.
Place the filled gingerbread house bundt pan on a baking sheet and bake for 60-70 minutes, until a wooden skewer inserted in the center comes out clean.
Step 6: Cool & Decorate
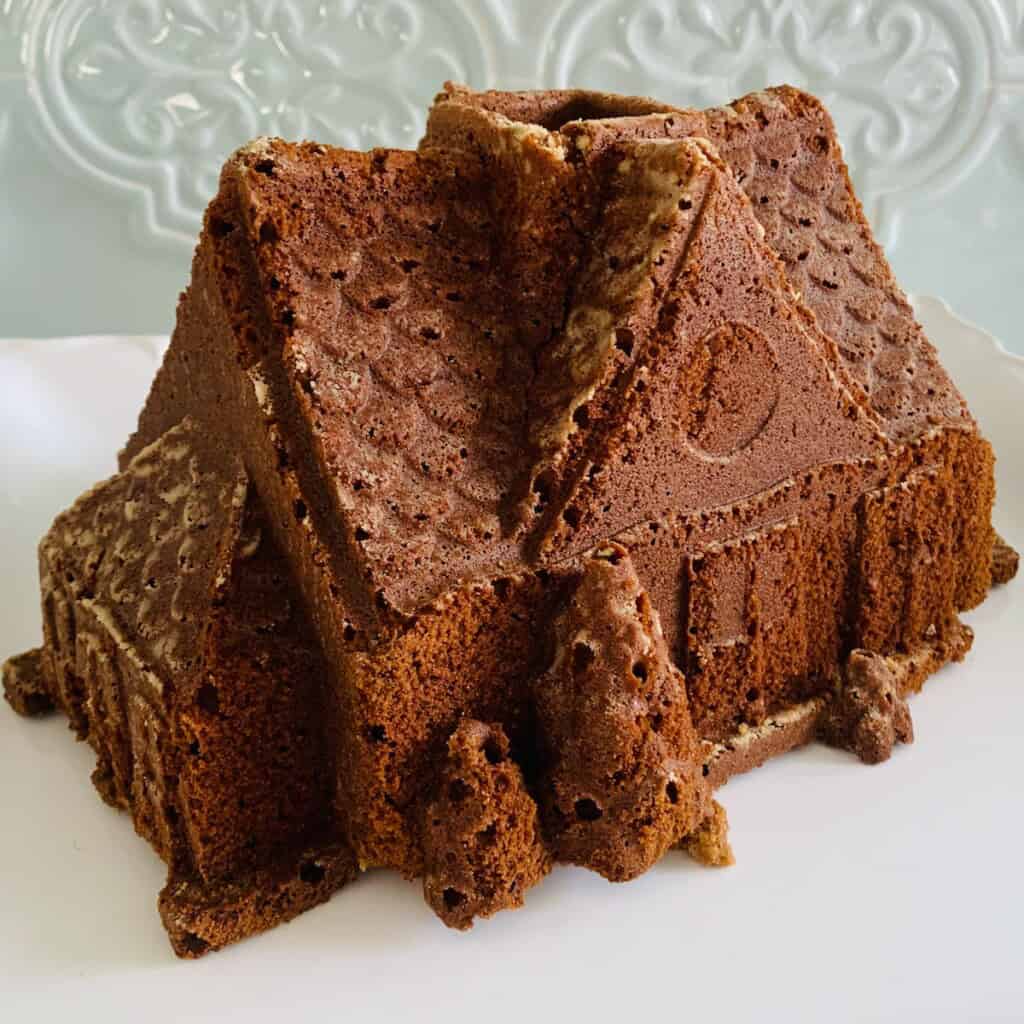
Remove from oven and cool in pan for 10 minutes.
Use a serrated knife to remove any excess cake if it formed a dome while baking, so your gingerbread house will have a stable, flat base when inverted.
Gently loosen the cake from the top edge of the pan with a knife (being careful not to scratch the pan) or spatula. Give it a good bump/shake all the way around to loosen the sides and bottom.
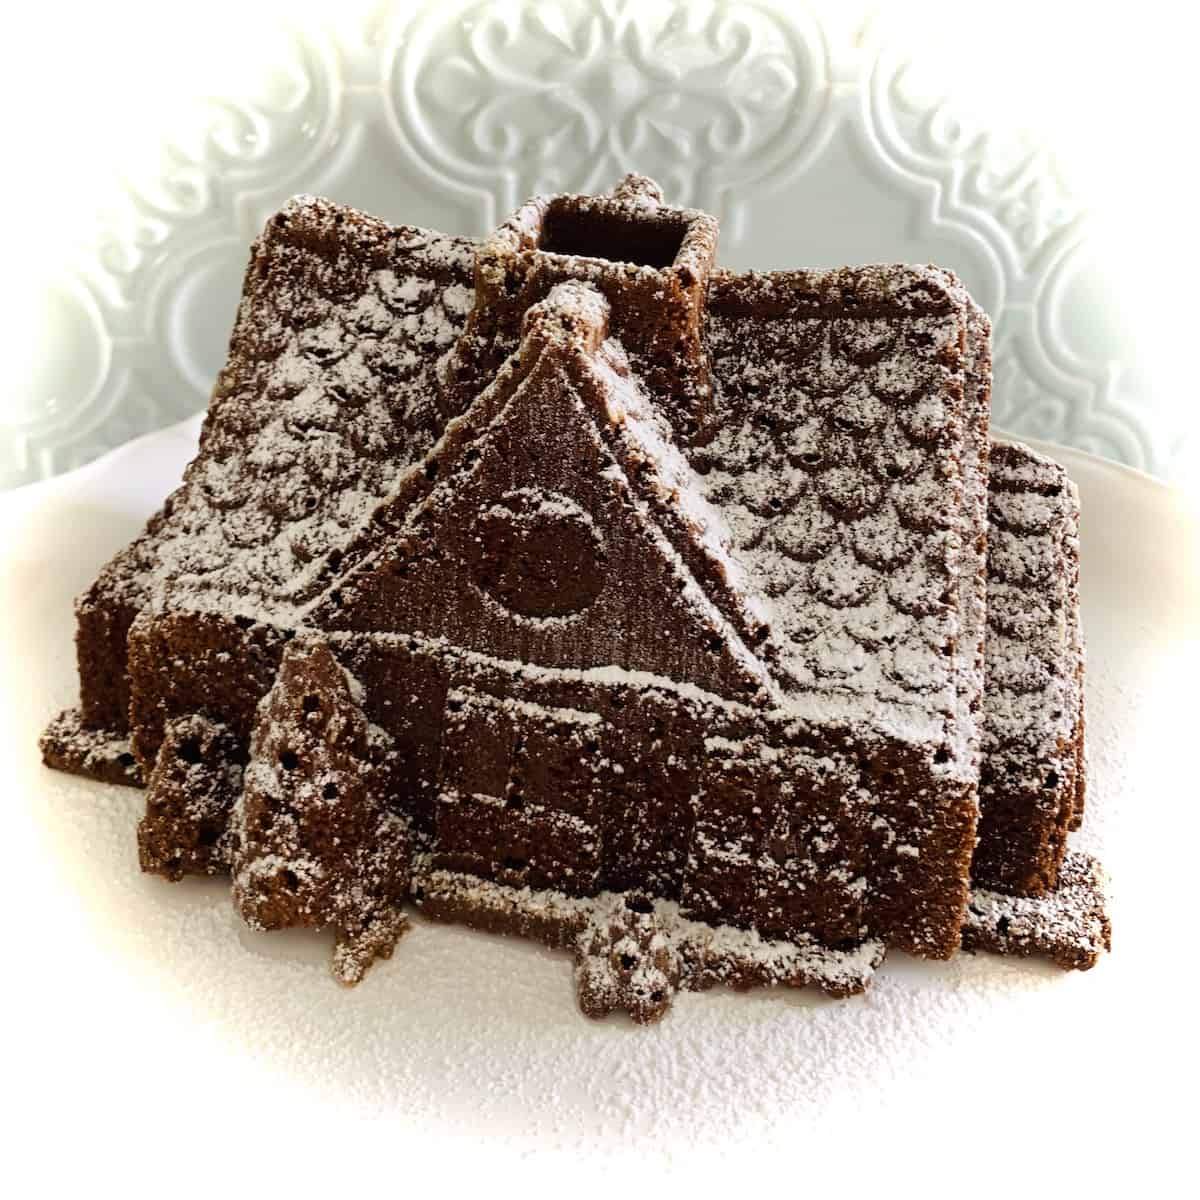
Then, turn the gingerbread house out onto a wire rack or cake plate and cool completely.
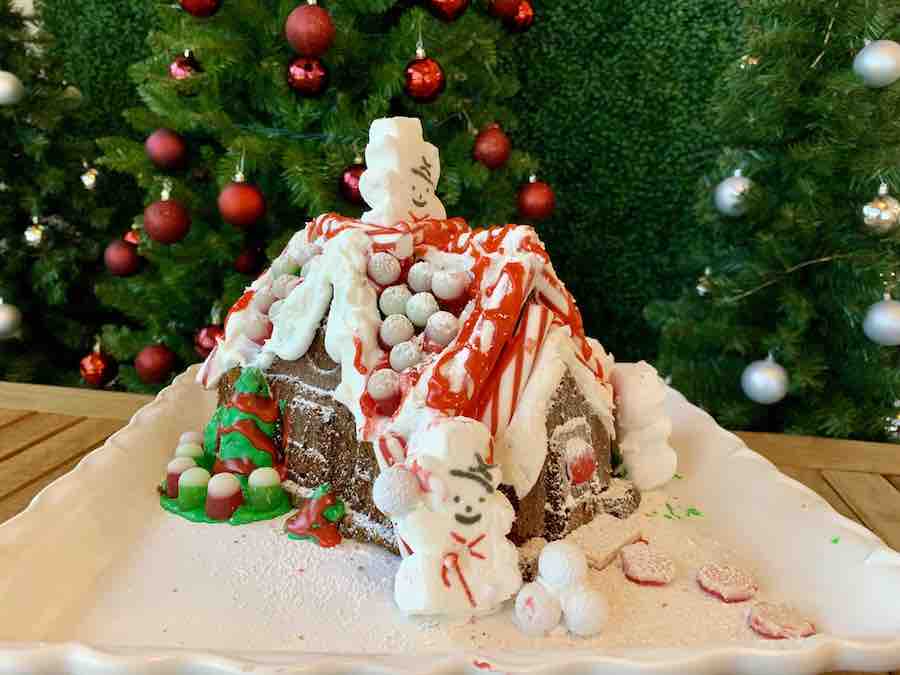
Decorate.
Gluten-Free Gingerbread House Decorations
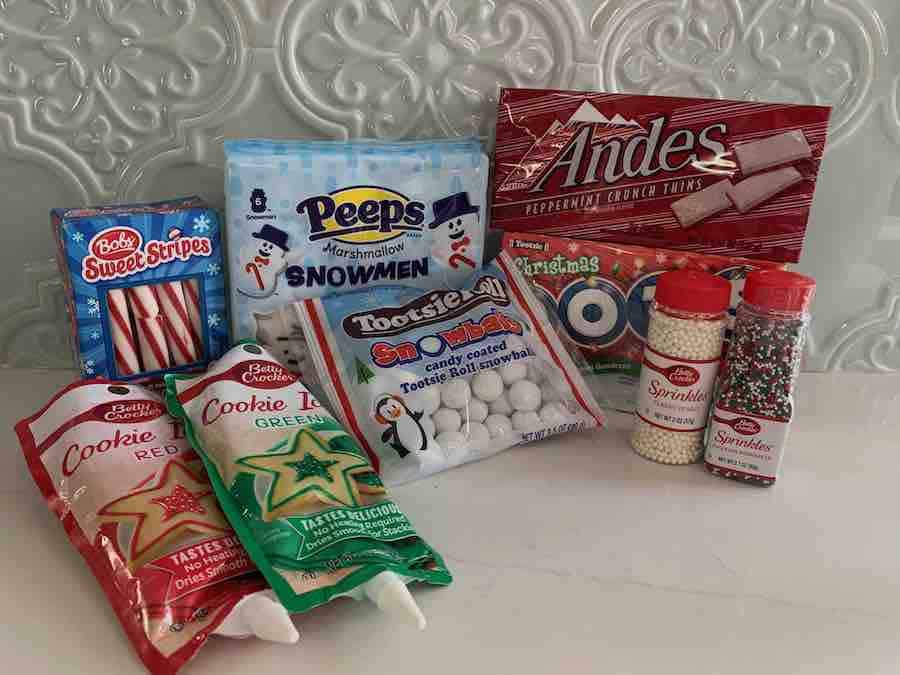
Always read labels or refer to manufacturer websites to determine the current gluten-free status of any product. This is especially true with seasonal products where manufacturing conditions vary, and what was safe last year is not safe this year, or vice versa.
Candy Decorations
- Miniature Candy Canes: Yum Earth's Candy Canes are labeled gluten-free right on the box.
- Peep's Christmas Marshmallows (gingerbread men, snowmen & Christmas trees) are labeled gluten-free.
- Jelly Belly Jelly Beans, Dots, and Mike & Ikes are affordable, labeled gluten-free, and take on the job of colorful gumdrops.
- Andes Peppermint Crunch Thins make cute roof tiles, windows, and pathways, and they are labeled gluten-free.
- Betty Crocker Cinnamon Imperials are listed as gluten-free on the Betty Crocker website, and taste like Christmas.
Icing/Frosting to "Glue" Candy & Decorate
- Betty Crocker Cookie Icing is labeled gluten-free.
- Fill a piping bag with store-bought frosting (most tubs are labeled gluten-free) or homemade buttercream.
Simple Decorations
Sprinkle the house with a dusting of powdered sugar or use white icing to trace the details.
For more candy inspiration, check out my Gluten-Free Christmas Candy List!
Expert Tips!
- Use Crisco or softened butter and a dusting of gluten-free flour to grease and flour a pan. I use a pastry brush to evenly coat all of the tiny details. The Crisco may leave little holes in the details of the finished cake, but those flaws disappear when covered in powdered sugar, icing, and candy! Do not use a gluten-containing Baking Spray!
- Gently tap the batter-filled pan against a cutting board or the counter covered with a dish towel. This helps to get the batter into the many details of the bundt pan.
- Use a spatula to push the batter up the sides of the bundt pan. The center of the cake will rise and form a dome while baking, so this helps to reduce the size of the dome and make sure the finished cake fills in all of the details along the bottom of the gingerbread house.
- Let the cake rest for 10 minutes before removing it from the pan. The Nordicware gingerbread house bundt pan is excellent quality and releases the cake easily if you let it rest for 10 minutes (but not more than an hour, or it will begin to stick to the pan). Carefully loosen the gingerbread house around the edges with a knife or spatula, and shake the pan a little side-to-side, if necessary. Then invert the cake on a wire rack or platter to cool completely.
6 Seasonal Variation Ideas!
Once you buy the house mold, using it over and over decreases the cost of each gingerbread house until they are practically free. Girl math!
Make a gluten-free house for every occasion:
- Halloween Haunted Mansion, made with chocolate cake, and pumpkin & ghost-shaped Peeps
- Barbie Dream House with Funfetti cake decorated with pink frosting and pink candy
- Valentine's Day Sweetheart House with pink & red frosting and heart-shaped candy
- St. Patrick's Day House with green frosting and vanilla cake dyed green
- Fairy Cottage with pastel icing and candy (like Skittles) formed into flowers
- Easter Bunny House with pastel icing, pastel rainbow sprinkles, and easter candy
Storing & Freezing
Store the gingerbread house, decorated or undecorated, at room temperature for 2-3 days. Confirm the food safety of your icing and decoration choices.
Texture-wise, the crumb is moist within the first couple of days of baking. After that, it will begin to dry out a bit.
Do not refrigerate, as the cake will dry out significantly in the refrigerator.
For longer storage, cover the undecorated cake tightly with plastic wrap and store in an airtight container in the freezer for up to three months.
Frequently Asked Questions
Yes. However, gluten-free gingerbread kits do not typically include pre-assembled houses or even pre-baked walls, due to the fragility of the gingerbread. Most gluten-free gingerbread kits include ingredients and supplies for three steps: bake the walls/roof, assemble the house, and decorate.
Alternatively, check with your local gluten-free bakery. Some offer assembled gluten-free gingerbread houses or pre-baked walls, as they don't have to risk shipping and accidental damage.
The cost of making a gluten-free gingerbread house the first year, when you need to buy the bundt pan, is comparable to or slightly more than the cost of buying a gluten-free gingerbread house. However, in subsequent years, when you reuse the bundt pan, it is cheaper to make a gluten-free gingerbread house than to buy a kit every year. Once you own the mold, you only need to buy the cake ingredients. The decorations can be as inexpensive as a tub of frosting and a box of Mike & Ike's.
Yes. You'll need two boxes of cake mix. The Nordicware gingerbread house bundt pan holds 9 cups of batter, which is generally slightly less than 2 boxes of cake mix. Fill the bundt pan ¾ full, and use leftover batter to make a few cupcakes.
Yes, you can make a gluten-free gingerbread house ahead. Store at room temperature for 2-3 days. Or cover with plastic wrap and store in an airtight container in the freezer for up to 3 months.
If decorated, check your buttercream recipe instructions for food safety guidelines, as this may shorten the time the gingerbread house is safe at room temperature.


I hope you love this Gluten-Free Gingerbread House as much as we do! If you give it a try, please leave a comment and star rating below. I'd love to hear from you!

Gluten-Free Gingerbread House
Ingredients
- 2¾ cups gluten-free flour blend with xanthan gum (plus extra for flouring the pan) I use King Arthur Gluten Free Measure for Measure Flour
- 3 teaspoon baking powder
- 1 teaspoon salt
- 3 teaspoon ground ginger
- 2 teaspoon ground cinnamon
- ½ teaspoon ground cloves
- ¼ teaspoon ground nutmeg
- 1 cup dark brown sugar
- ⅔ cup granulated sugar
- 1 cup butter softened, at room temperature
- 4 eggs at room temperature
- 1 teaspoon vanilla extract
- 1¼ cup milk
- Optional for decorating: powdered sugar, frosting, and candy
Instructions
- In a medium mixing bowl, sift together gluten-free flour, baking powder, salt, ginger, cinnamon, cloves, and nutmeg. Set aside.
- In a stand mixer, cream brown sugar, granulated sugar, and butter for three minutes, until light and fluffy. Mix in the eggs one at a time until combined. The mix in the vanilla.
- On low speed, gradually mix in the dry ingredients, alternating with the milk to maintain moisture. Mix an additional two minutes.
- Let batter sit for 15-20 minutes, so the gluten-free flour has time to hydrate, creating an ideal texture in the finished cake.
- While the batter rests, preheat oven to 325℉. Grease and flour the gingerbread house bundt pan, using Crisco or soft butter and gluten-free flour to dust the details of the pan. (Caution: do not use a gluten-containing Baking Spray.)
- Spoon batter into prepared gingerbread house bundt pan, filling only ¾ full. Spread the batter up the sides of the pan, so it is lower in the center and the sides are covered.
- Place the filled gingerbread house bundt pan on a baking sheet and bake for 60-70 minutes, until a wooden skewer inserted in the center comes out clean.
- Remove from oven and cool in pan for 10 minutes. Then, turn the cake out onto a rack and cool completely.
- Decorate.


Leave a Reply