Many years ago, a college friend (and native New Yorker) opened a New York-style pizzeria in our old college town. It was at that pizza shop that I was first introduced to garlic knots.
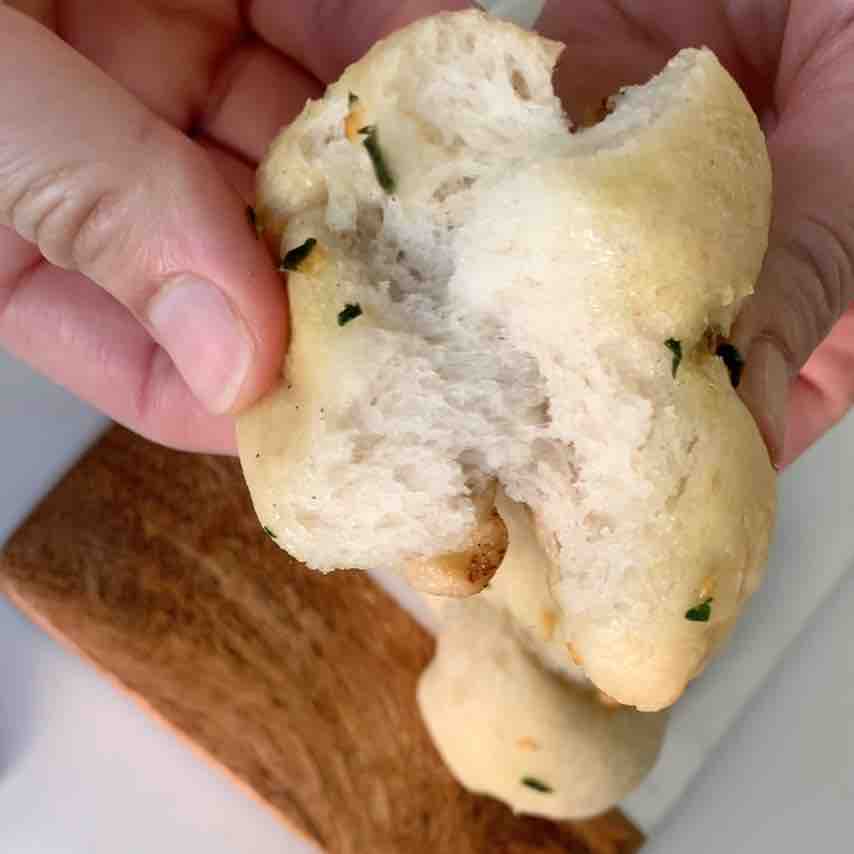
They have all of the airy texture of the perfect pizza crust... covered with fragrant garlic and butter. Oh, how I loved those garlic knots!
Since my celiac diagnosis nearly ten years ago, I had eaten exactly zero garlic knots... until I discovered the best gluten-free flour for making pizza and realized it could make just-as-amazing gluten-free garlic knots.
The flour used in this recipe is revolutionary for those of us on a medically necessary gluten-free diet. Together with yeast, you get the same fabulous rise and soft, bready crust you've been missing.
Some of the links on this post are affiliate links. To learn more, visit our Disclosures.
Gluten-Free Wheat Starch Based Flours
Did I lose you at wheat?
Important side note, gluten-free wheat starch is not safe for individuals with a wheat allergy. If that's you, this recipe is not going to work. You'll need a recipe designed using a different gluten-free flour.
However...
For those of us with celiac disease, who react specifically to the gluten-protein in wheat, gluten-free wheat starch is a game changer.
Gluten-Free wheat starch has been processed to remove the gluten-containing protein, leaving you with just the remaining starch. It still contains wheat, which is why it is unsafe for those with a wheat allergy.
To be labeled gluten-free, according to FDA rules, gluten-free wheat starch must be processed to remove gluten to below 20 parts per million.
Important, to be safe for individuals with celiac disease wheat starch must have a gluten-free claim on the label. To learn more about gluten-free wheat starch, visit "Is Gluten-Free Wheat Starch Safe for Celiacs?"
Gluten-Free Ingredients
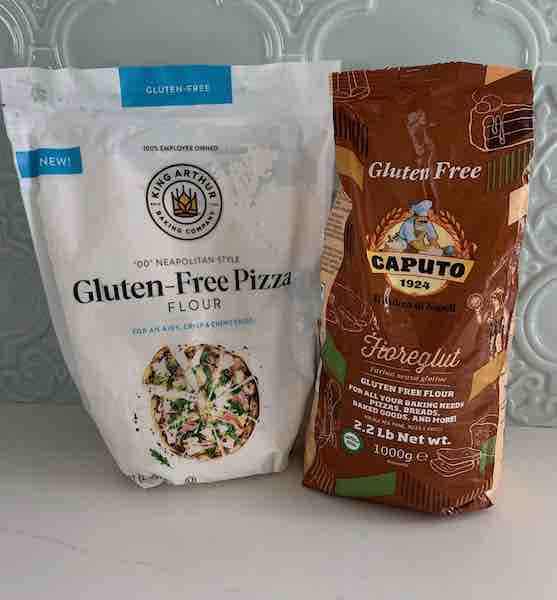
The most critical ingredient in this recipe is the flour. Caputo Fioreglut Gluten-Free Flour and King Arthur 00 Gluten-Free Pizza Flour are both flour blends formulated to be used in yeast bread recipes. See the notes in the recipe card, if using King Arthur 00 Gluten-Free Pizza Flour.
Caputo Fioreglut Gluten-Free Flour is commonly used among celiacs in Italy and bears the gluten-free seal of the Italian Health Ministry.
King Arthur 00 Gluten-Free Pizza Flour is labeled gluten-free. According to King Arthur, the gluten-free wheat starch is tested going into the factory. After production, the final pizza flour is tested again to below 20 parts per million (ppm) of gluten, with a target of below 10 ppm. Disclosure, King Arthur sent me the flour that I used to test this recipe, at no charge.
Important! Both of these companies also make flours that are not gluten-free. Please make sure you are purchasing the gluten-free versions.
This recipe is not recommended for any flour other than gluten-free wheat starch-based flour.
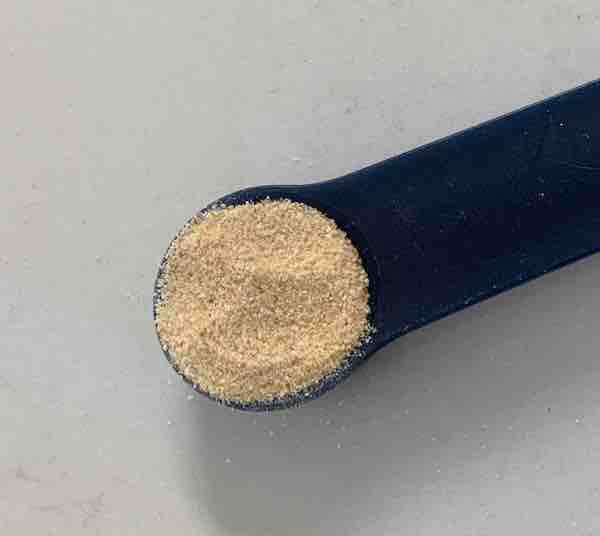
If gluten-free wheat starch is the secret ingredient that makes this recipe fantastically, undetectably gluten-free, Instant Yeast is the magic that makes it easy. I use Fleischmann's Rapid Rise Instant Yeast.
Instant Yeast granules are so fine that they start working with just the heat created while mixing the dough. No extra steps. Just make sure your yeast is not expired. Then, include the yeast in the dough mixture and it starts working to make your dough rise. So simple!
If you've not worked with gluten-free wheat starch before, just mixing the ingredients may make you so happy you could cry. The fragrance of this dough made with wheat starch and yeast will transport you back to before your gluten-free days.
While the dough is a bit of a science, using carefully tested flour-to-liquid ratios, the topping is an art. Feel free to adjust the ingredients to what you love and have on hand.
Fresh garlic is one of my favorite ingredients, so I keep it as a staple in my kitchen. But you can use dried garlic in a pinch.
2 teaspoons of dried parsley or Italian seasoning can be used instead of 2 tablespoons of fresh parsley. Have a basil plant? Use fresh basil instead of parsley!
Include parmesan cheese in the topping mixture for even more flavor.
My family loves olive oil, so I sometimes use olive oil on the knots after baking, instead of butter.
Truly, you can't mess up the topping!
Instructions
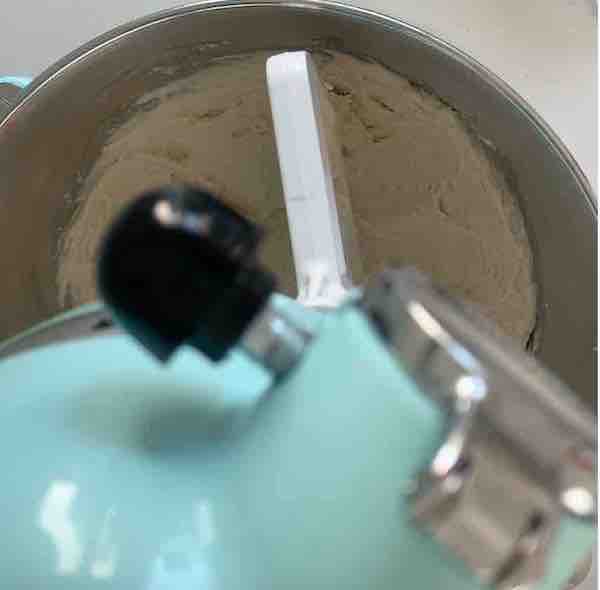
Mix Caputo Fioreglut Gluten-Free Flour (or King Arthur 00 Gluten-Free Pizza Flour), instant yeast, salt, garlic powder, and warm water in a stand mixer with the flat beater attachment on speed #2 for five minutes.
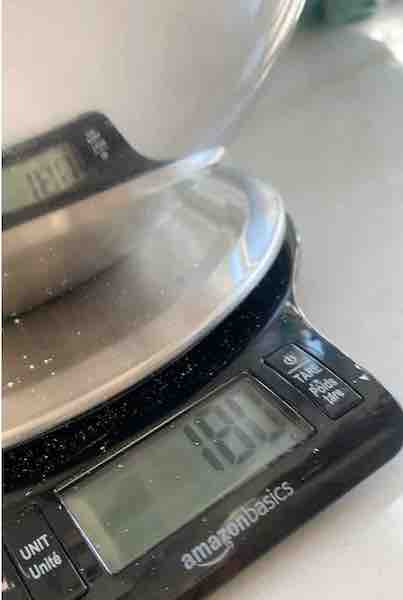
The recipe calls for 180g of Caputo Fioreglut Gluten-Free Flour. If using King Arthur 00 Gluten-Free Pizza Flour, increase the water according to the notes in the recipe card.
If you have a kitchen scale, weighing is the most accurate method.
If not, scoop the flour into a measuring cup and level it with a knife for more precise measurements. Due to the differences in the flour blends, you will need to measure either 2 cups of Caputo Fioreglut Gluten-Free Flour or 1 ½ cups of King Arthur 00 Gluten-Free Pizza Flour.
Room temperature or warm water is fine. I use cold water from my refrigerator water filter, so I like to warm it up for thirty seconds in the microwave. It should not be hot, or it could kill the yeast.
A stand mixer makes kneading the dough a breeze. It can be a splurge, but gluten-free baking generally requires more mixing than traditional baking. I highly recommend buying a stand mixer when it's on sale.
For this recipe, the flat beater attachment for the stand mixer works better than the dough hook.
If you don't have a stand mixer, you can use your bread machine's kneading setting or simply knead the dough with good, old-fashioned elbow grease. For hand-mixing, mix the ingredients in a medium bowl, then knead by hand on the counter for 10 minutes.
Add 1 ½ tablespoons of olive oil to the dough and mix on the lowest speed for two more minutes. Let the dough rest in the refrigerator for 10 minutes.
Up to 10 minutes of rest time in the refrigerator will make the dough less sticky and easier to shape. You want to keep it in the refrigerator to delay rising, as you'll get one really good rise after you form the knots.
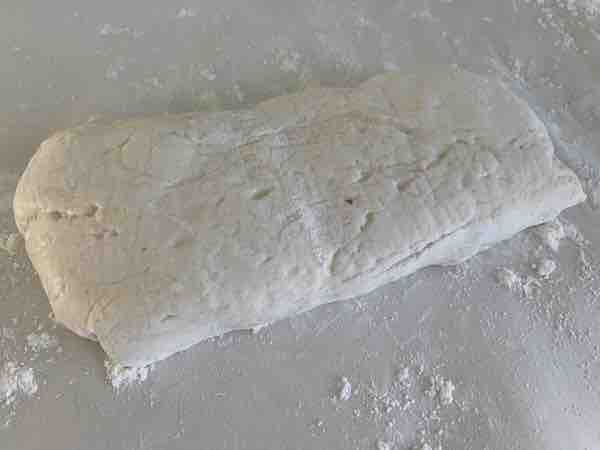
Lightly dust your work surface and dough with gluten-free flour or cornstarch as needed. Alternatively, you can rub a little olive oil on your hands to prevent sticking. Press or roll the dough to form it into a log approximately 12" long. Cut the log into 8 even pieces.
Use extra Caputo Fioreglut Gluten-Free Flour (or King Arthur 00 Gluten-Free Pizza Flour) to lightly dust your work surface. Or use an inexpensive gluten-free flour or cornstarch.
You will be amazed at how much this dough acts like traditional bread dough! You should be able to easily form it into a 12" long log. This doesn't have to be perfect, but you do want it to be relatively uniformly rectangle, so you can cut 8 relatively-even pieces of dough.
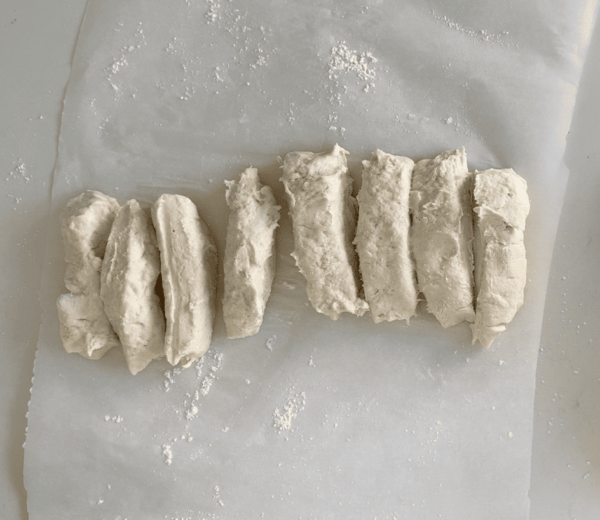
Gently roll and pull each piece of dough with your hands until it forms a rope about 8" long.
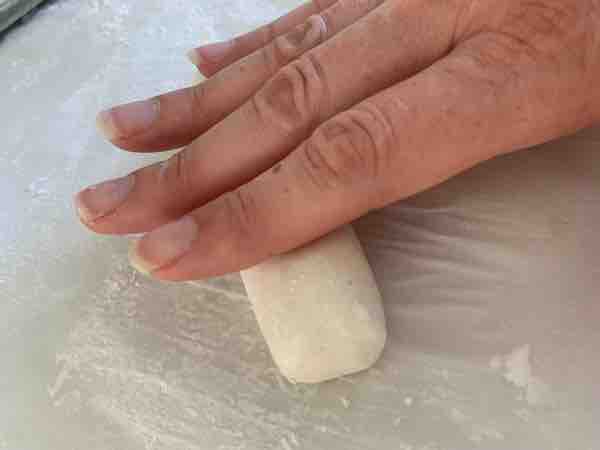
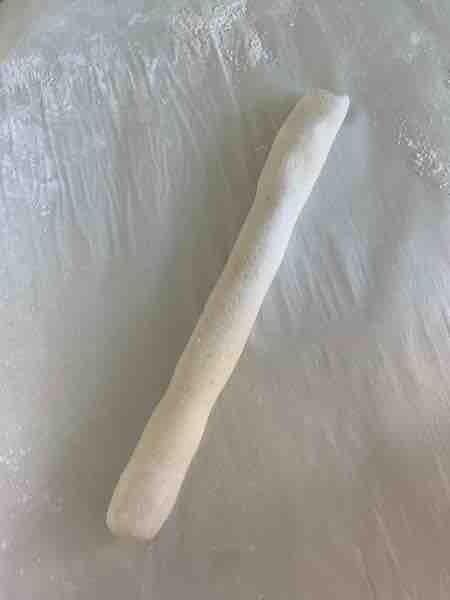
Bring your preschool playdough skills! It's time to roll out each piece of dough into a rope. Roll the dough and pull the ends until it is about 8" long. Picture the short side of a letter-size piece of paper (8½ x 11) to approximate the length of each rope.
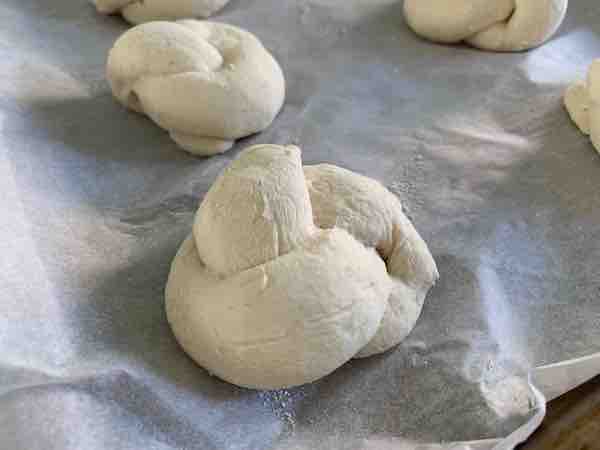
Gently tie each rope into a knot and tuck the two ends of the rope under the knot.
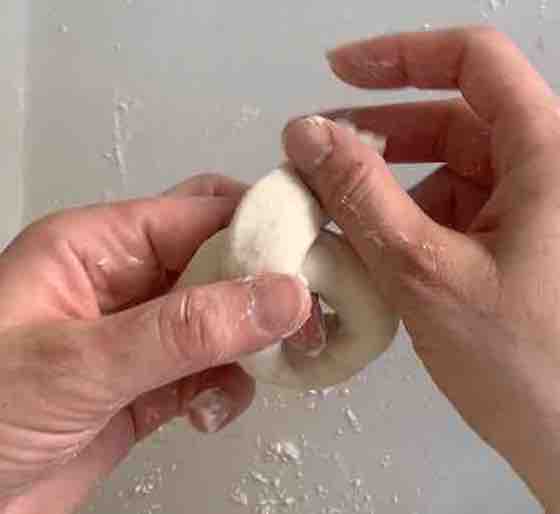
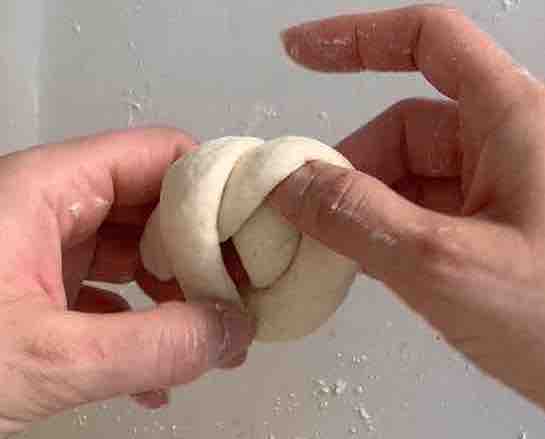
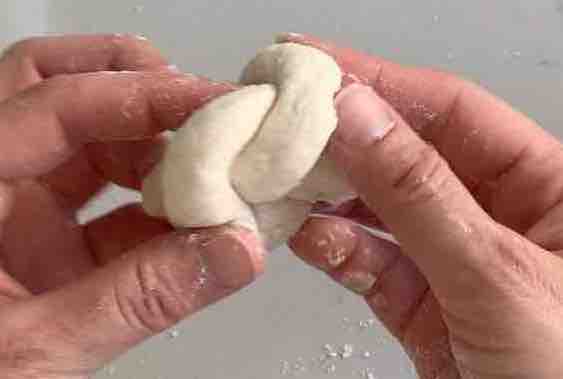
It may take a try or two to get comfortable tying the knots. The dough is forgiving. If you aren't happy with your first try at making a knot shape, roll out the rope and try again.
Once you get it down, you'll find the dough very easy to work with.
You don't need perfect knots. As the dough rises, it will hide imperfections.
Place the shaped knots onto a baking pan lined with a silicone mat or parchment paper for easy cleanup.
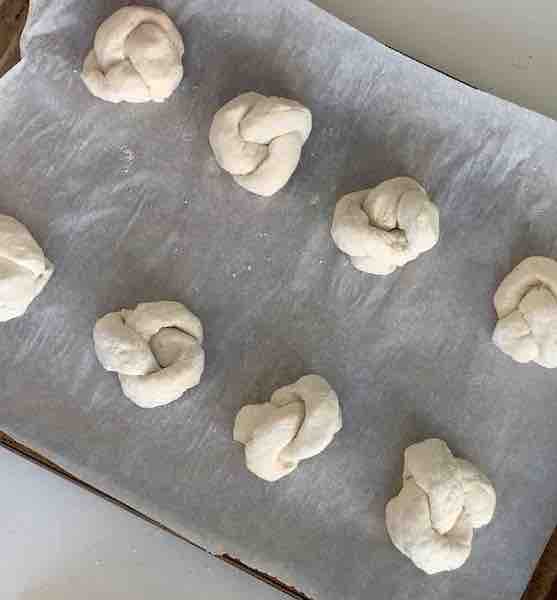
Cover the baking pan with plastic wrap. Let the dough rise for three hours in a warm place.
To prevent the plastic wrap from sticking to the dough, spray a little cooking spray on the underside of the plastic wrap before covering the dough knots.
Letting dough rise is effortless. It only requires patience. The knots will double into beautiful, puffy knots in about two hours.
Even better! Let the rolls rise overnight! Reduce yeast in the recipe to ¾ teaspoon. Place the garlic knot dough in a lined baking pan and cover with plastic wrap. Place garlic knots in the refrigerator for 8-24 hours. When ready to bake, remove the baking pan from the refrigerator, remove the plastic wrap, and place the baking pan on top of the stove (it will be slightly warmer than the rest of your kitchen) while the oven preheats.
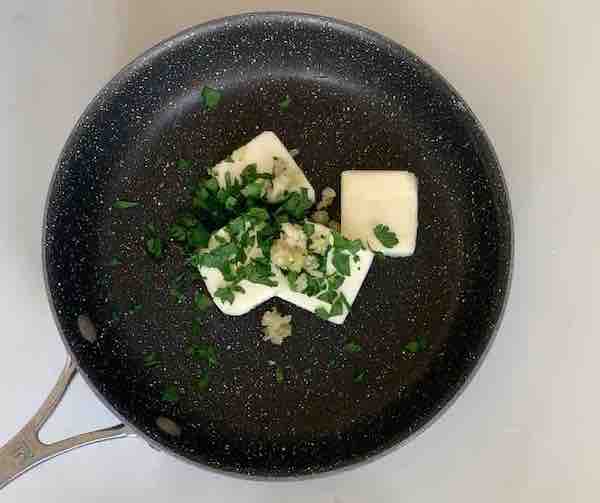
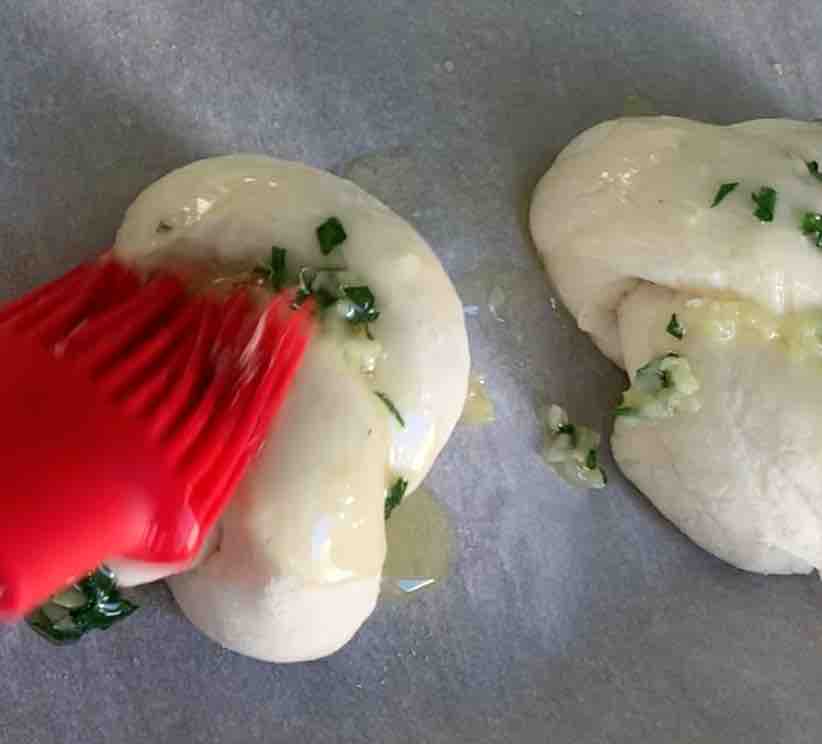
Towards the end of the rising time, combine butter, garlic, and parsley (and optional grated parmesan cheese) in a small frying pan or saucepan over medium/low heat for approximately five minutes until butter is melted and flavors combine.
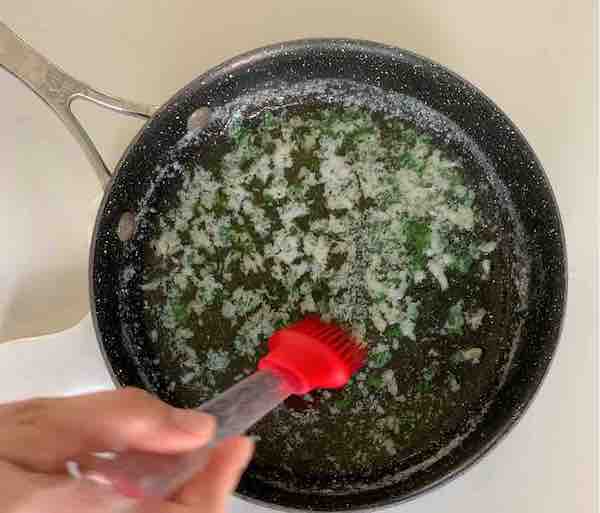
When garlic knots are done rising, preheat oven to 400℉ and remove plastic wrap. Brush half of the garlic-butter mixture onto the knots and reserve the other half for after baking.
Bake garlic knots for approximately 25 minutes until golden brown.
Keep an eye on the garlic knots for the last 3-5 minutes of baking. They'll be a beautiful golden brown when ready.
When the garlic knots are golden brown, remove them from the oven and use a pastry brush to coat them generously with the remaining garlic-butter topping. Serve and enjoy!

These garlic knots make the perfect side dish for soup or spaghetti and gluten-free meatballs. You can also serve them with marinara sauce for a delicious snack.
Easily double or triple the recipe for a crowd-pleasing, game-day appetizer.
In the unlikely event you have leftover garlic knots, store them in an airtight container at room temperature for up to two days. Any longer than two days, move your garlic knots to the freezer for up to three months.

Gluten-Free Garlic Knots
Ingredients
Gluten-Free Dough
- 180 grams Caputo Fioreglut Gluten-Free Flour (2 cups, spooned & leveled) (see notes for using King Arthur 00 Gluten-Free Pizza Flour)
- 1 heaping teaspoon Instant Yeast Fleischmann's Rapid Rise Instant Yeast is gluten-free
- ¾ teaspoon salt
- ½ teaspoon garlic powder
- ½ cup plus 2 tablespoons water room temperature or warm (not hot)
- 1 tablespoon olive oil
- extra flour or cornstarch for dusting surface
- cooking spray to lightly coat plastic wrap for dough rising
Garlic Butter Topping
- 4 tablespoons salted butter
- 3 cloves fresh garlic, minced (or ½ teaspoon garlic powder)
- 2 tablespoons fresh parsley, chopped (or 2 teaspoons Italian seasoning or dried parsley)
- optional: 2 tablespoons grated parmesan cheese
Instructions
- Mix gluten-free flour, instant yeast, salt, garlic powder, and warm water in a stand mixer with the flat beater attachment on speed #2 for five minutes.
- Add olive oil to the dough and mix on the lowest speed for two minutes. Let dough rest in the refrigerator for 10 minutes.
- Lightly dust your counter and dough with gluten-free flour or cornstarch as needed. Press or roll the dough to form it into a log approximately 12" long. Cut the log into 8 even pieces.
- Roll and pull each piece of dough with your hands until it forms a rope about 8" long.
- Gently tie each rope into a knot and tuck the two ends of the rope under the knot. Place tied knots onto a baking pan lined with a silicone mat or parchment paper for easy cleanup.
- Lightly spray the underside of a sheet of plastic wrap with cooking spray to prevent sticking, and cover the baking sheet. Let the dough rise for three hours in a warm place until the knots have doubled in size. (See notes for overnight option)
- Towards the end of the rising time, combine butter, garlic, and parsley (and optional parmesan) in a small frying pan or saucepan over medium/low heat for approximately five minutes until butter is melted and flavors combine.
- When garlic knots are done rising, preheat oven to 400℉ and remove plastic wrap or towel. Brush half of the garlic-butter mixture onto the knots and reserve the other half for after baking.
- Bake garlic knots for approximately 20-25 minutes until light golden brown.
- Remove from the oven when knots are golden brown and brush generously with the remaining garlic-butter topping. Serve.


Leave a Reply